Are you looking for the best Yoast SEO settings? If you are, keep reading this post!
Setting up the correct SEO settings is crucial for improving your site’s visibility on search engines.
While the default settings in Yoast SEO provide a solid start, customizing the plugin to match your specific needs can further boost your site’s performance.
In this guide, we’ll walk through how to configure Yoast SEO plugin — basic settings and advanced configurations to improve on-page SEO and search engine rankings.
But first, let’s see what Yoast is and what it has to offer.
☲ Table of Contents
- Yoast SEO: An Introduction
- What is the Main Benefit of Using Yoast?
- How to Install and Activate Yoast WordPress SEO Plugin
- What Are the Default Yoast SEO Settings?
- How to Configure Yoast SEO plugin?
- Best Yoast SEO Settings to Improve SEO
- Yoast SEO Free vs Yoast SEO Premium
- How to Use Yoast WordPress SEO Plugin
- Bonus Tips on Optimizing the Website for Better SEO and Ranking
- Frequently Asked Questions
- What is the Yoast WordPress SEO Plugin?
- How can Yoast SEO improve my blog posts?
- What role do social profiles play in Yoast SEO?
- Should I use the Advanced settings in Yoast SEO?
- How does Yoast SEO prevent duplicate content issues?
- What is cornerstone content in Yoast SEO?
- How does Yoast SEO integrate with Webmaster Tools?
- What is the importance of setting a focus keyword in Yoast?
- Is Yoast SEO free?
- Do I need both Yoast SEO and Yoast SEO Premium?
- Why is Yoast better than Rank Math?
- What is the difference between Yoast and SEMrush?
- Is Yoast better than Surfer SEO?
- What is the sitemap limit in Yoast?
- Does Yoast only work with WordPress?
- How do I add Google Search Console to Yoast SEO?
- How do I change the separator in Yoast SEO?
- Does Yoast SEO slow down a website?
- Conclusion
Yoast SEO: An Introduction
Yoast SEO is one of the best plugins that helps WordPress users optimize their sites for search engines.
Whether you’re managing blog posts, eCommerce products, or other content types, Yoast makes SEO data optimization simple and effective. It provides valuable insights for focus keyphrases, improving every piece of content for better search rankings.
With Yoast Premium, you gain even more control over your SEO strategy, including enhanced social network integration and the ability to customize every aspect of your site’s SEO.
Here are some of the best Yoast Seo features:
- SEO analysis
- Readability analysis
- Focus keyword optimization
- Meta title & description templates
- Social media previews
- XML sitemaps
- Internal linking suggestions
- Redirect manager (Premium)
- Breadcrumbs functionality
And so on.
Now you know what Yoast is and what it has to offer. Next, we will learn the main advantages of the Yoast SEO WordPress plugin.
What is the Main Benefit of Using Yoast?
The main benefit of using the Yoast SEO plugin is how it simplifies Search Engine Optimization for users of all levels.
From optimizing primary keywords to managing social sharing images, Yoast gives you complete control over how your content appears in search engines and on social media platforms.
With features like the breadcrumbs and content schema, the plugin makes your site search engine-friendly without any extra effort.
Yoast Premium takes things a step further with internal link suggestions, Video SEO, and features that help you optimize each post format better.
Even small features like Insert variable in titles and meta descriptions streamline your SEO workflow.
Overall, Yoast offers numerous benefits that you can use to optimize your WordPress website or WooCommerce store.
How to Install and Activate Yoast WordPress SEO Plugin
Installing Yoast SEO is a straightforward process. The first thing you need to do is log in to your WordPress website and navigate to the ‘Add New’ plugins section.
There, you can search for Yoast SEO. Once you have found the plugin, install it on your website.
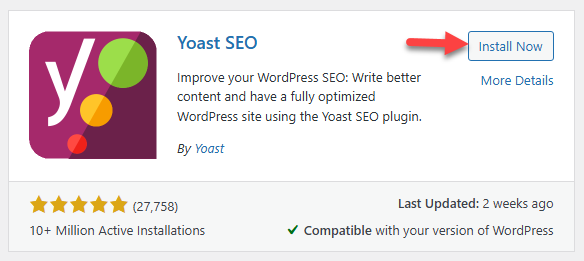
Once you have completed the installation, you can activate it.
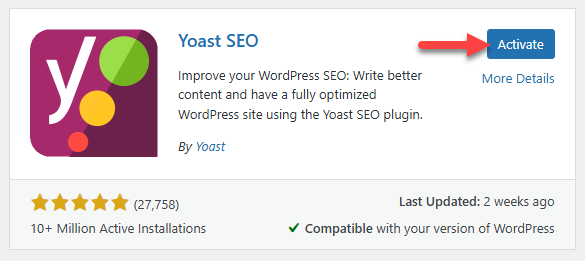
After that, you can see the plugin’s settings on the left-hand side of the WordPress dashboard.
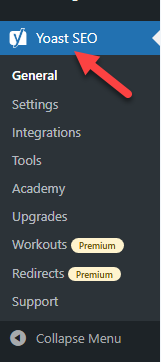
If you have the Yoast SEO Premium plugin, you can install and activate it manually directly from the dashboard or using an FTP client.
You don’t need any special or advanced Yoast SEO requirements for installation or use. Simply make sure you have a functional WordPress website running the latest WordPress version, and you’re ready to install and use Yoast SEO.
What Are the Default Yoast SEO Settings?
When you first install and activate the Yoast WordPress SEO Plugin, it comes with a set of default settings.
Yoast enables features like SEO analysis, readability checks, and a basic XML sitemap.
It automatically handles meta robot settings for pages and posts, hides author archives (if there is only one author), and sets up structured data (schema) for your site.
Canonical URLs are also auto-generated to prevent duplicate content issues.
The default settings also provide a decent structure for SEO titles and meta descriptions, based on post types, using dynamic variables such as the post title, separator, and site name. These can be customized later, but the default configuration works well for most users starting.
How to Configure Yoast SEO plugin?
To configure the Yoast SEO plugin:
- Install and activate Yoast SEO from the WordPress plugins menu.
- Go to SEO → General and follow the Yoast SEO first-time configuration wizard (set site type, name, logo, and social profiles).
- In SEO → Settings, adjust features, set SEO titles/meta descriptions for posts, pages, and categories, and connect to Google Search Console if needed.
- Enable or disable archives, breadcrumbs, and media pages in the Advanced settings.
- Save all changes.
Yoast’s default settings work well, but customizing them can further improve your website’s SEO.
Best Yoast SEO Settings to Improve SEO
Under the plugin’s settings, you can see these options:
- General
- Settings
- Integrations
- Tools
- Academy
- Upgrades
- Workouts
- Redirects
- Support
Below, we will show you how each option can be configured for the best search engine optimization results. Let’s begin with the Yoast SEO setup for beginners.
1. General
Under General, you can see three sub-options.
- Dashboard
- Alert Center
- First-time configuration
We will take a look at three options below.
1. Dashboard
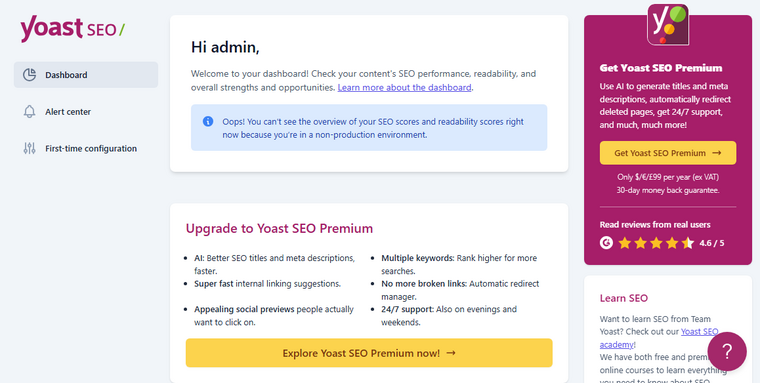
The dashboard doesn’t have any configuration options.
2. Alert Center
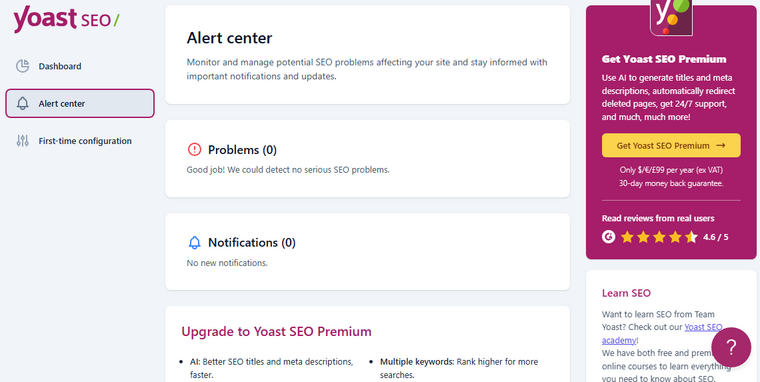
Here, the plugin will show you the problems or conflicts Yoast is facing, or the major SEO issues.
3. First-Time Configuration
The Yoast SEO first-time configuration is the point where the actual setup begins. The first thing you need to do is let the plugin perform SEO data optimization.
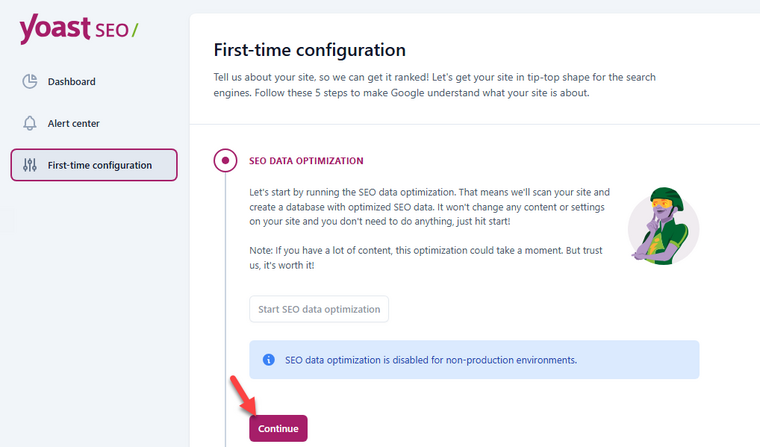
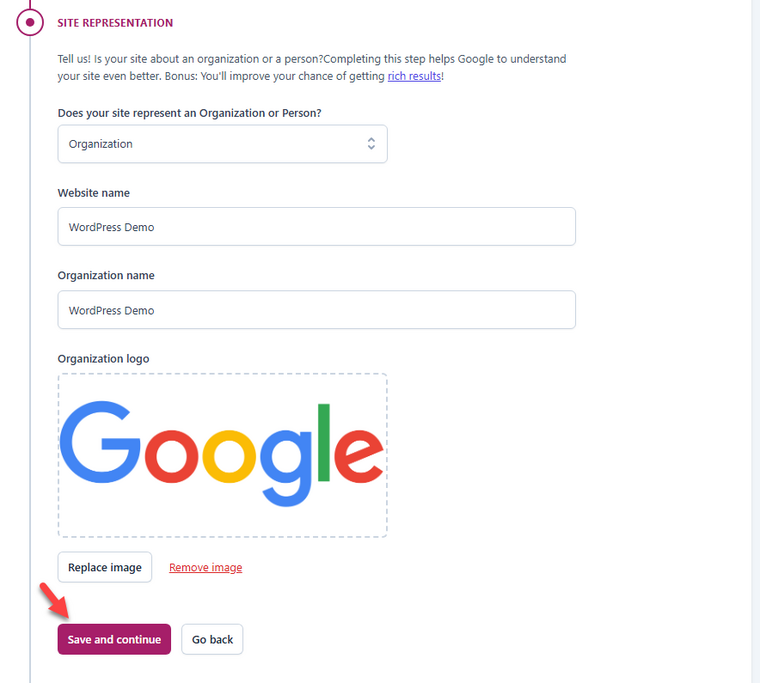
On the next page, you will see the site representation options.
There, you have to choose:
- Whether your website represents an organization or a person
- The name of the website
- Name of the organization or person
- Logo
After adding this data, you can move forward with the option.
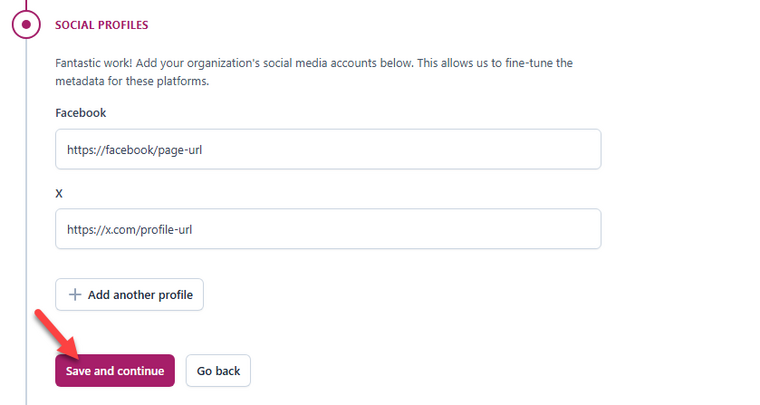
Next, you have to configure the social profiles. By default, Facebook and X profile boxes will be added. But if you need to add more social profiles, such as Instagram or Pinterest, click the + button and paste the link.
Now comes the personal preferences.
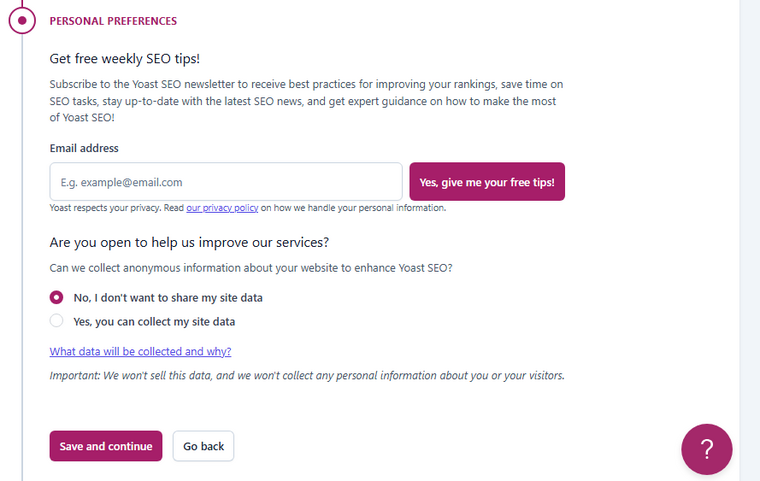
This is not an SEO configuration option. This is for keeping yourself updated with the latest SEO news, directly from the original source.
You have now successfully finished the plugin’s basic configuration.
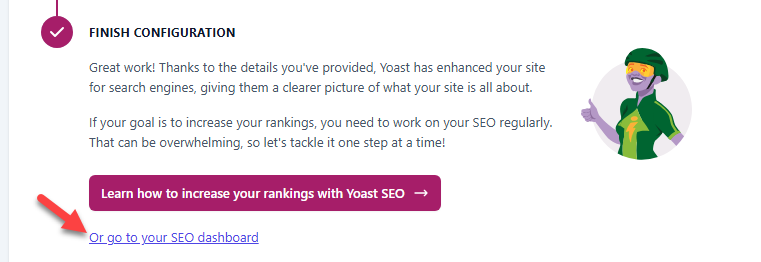
Once you’ve finished with this, move on to the next SEO configuration option.
2. Settings
Here comes the major Yoast SEO settings. Here, you can see options such as
- General
- Site features
- Site basics
- Site representation
- Site connections
- Content types
- Homepage
- Posts
- Pages
- Categoris & tags
- Categories
- Tags
- Advanced
- Crawl optimization
- Breadcrumbs
- Author archives
- Date archives
- Format archives
- Special pages
- Media pages
- RSS
Below, we will take a closer look at each option.
1. General
Here’s how you can adjust the General settings of Yoast.
1.1 Features
All the necessary features are enabled on the website.
- SEO analysis
- Readability analysis
- Focus keyword optimization
- Meta title & description templates
- Social media previews

If you need to disable a specific function, you can do it from this page.
1.2 Basics
Here, you can tweak the basic information like the website’s name, alternate name, separator, and so on.
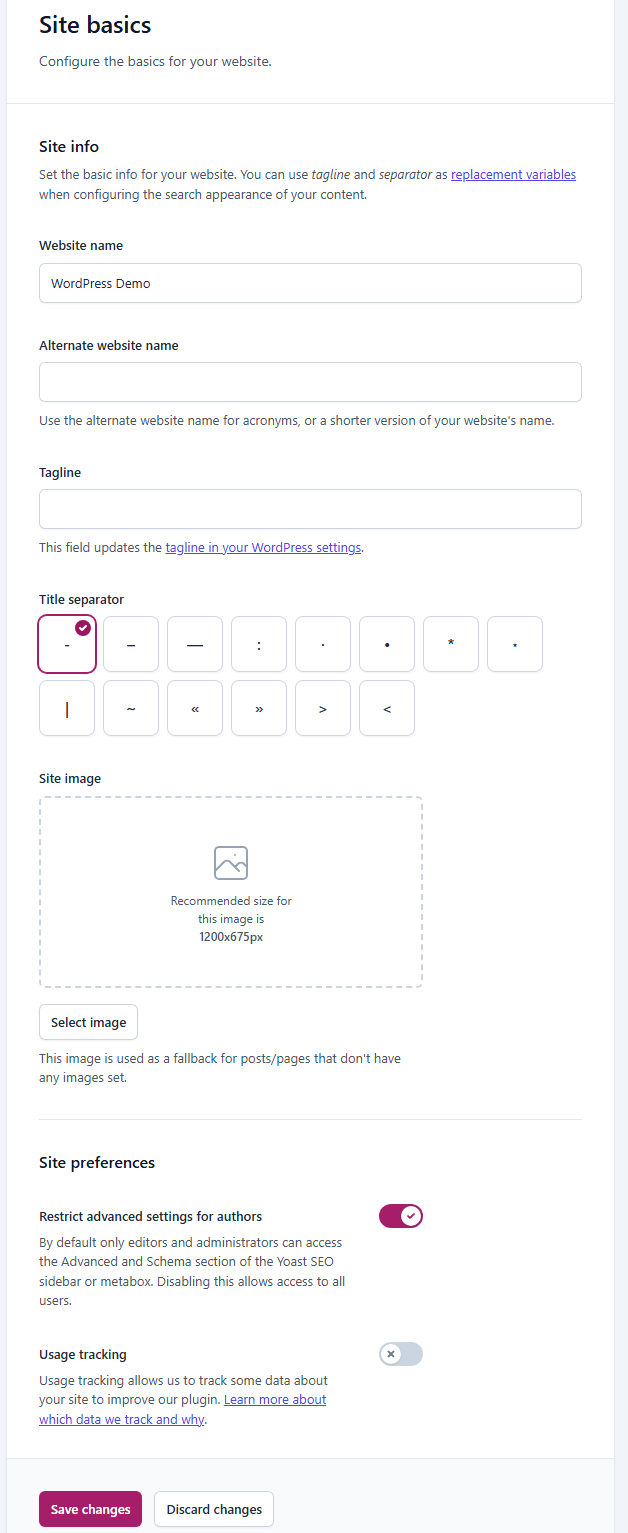
As the name says, these are just basic configuration options. You can do it yourself without any advanced knowledge.
Save the settings once you are done.
1.3 Representation
Here, you can switch between the ‘Organization’ and ‘Person’ options. We have already tweaked this option via the first-time configuration tab.
However, if you need to switch it up, you can use the representation tab.
1.4 Connections
From the Connections option, you can complete the Search Console verifications.
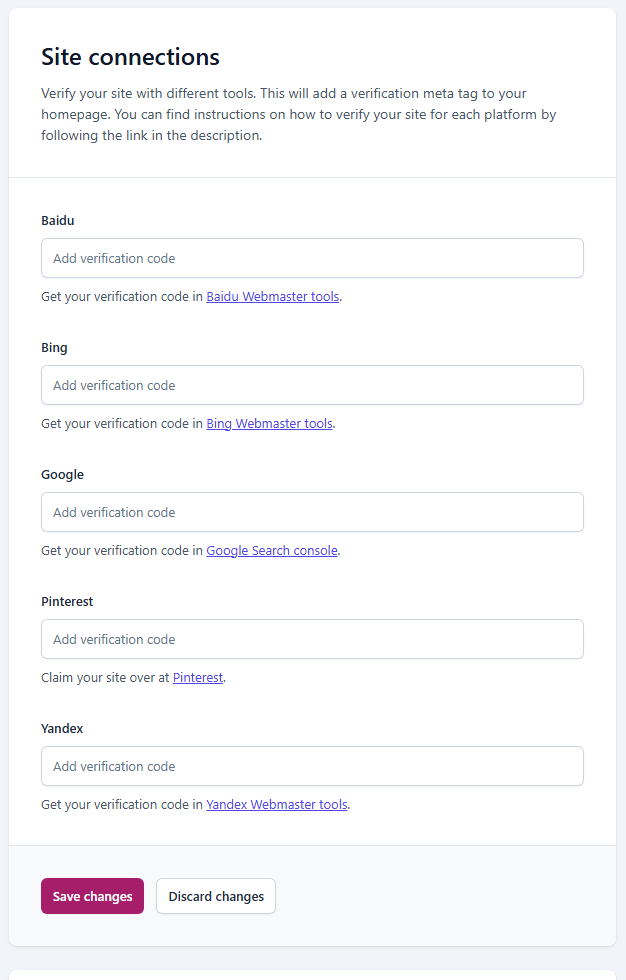
As you can see in the screenshot, you can add verification codes of:
- Baidu
- Bing
- Yandex
Once you have pasted the code, save the settings. You’re good to move forward.
2. Content Types
Under content types settings, you will find the Yoast Seo Search appearance settings. This section will help you customize the search appearance of the homepage, posts, pages, and custom post types, if you have any.
2.1 Homepage
Here, you can choose how your homepage should look in the search results.
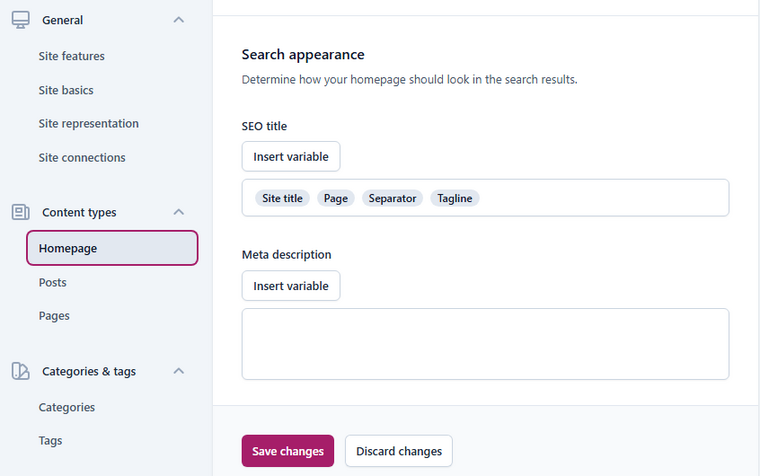
If you are using a static homepage, you can visit the individual page and customize the SEO title and meta description.
From the same page, you can customize the social title, social image, and social description.
2.2 Posts
Now, if you go to the posts settings, you can see similar configuration options.
Besides the SEO title and meta description, you can see some schema settings.
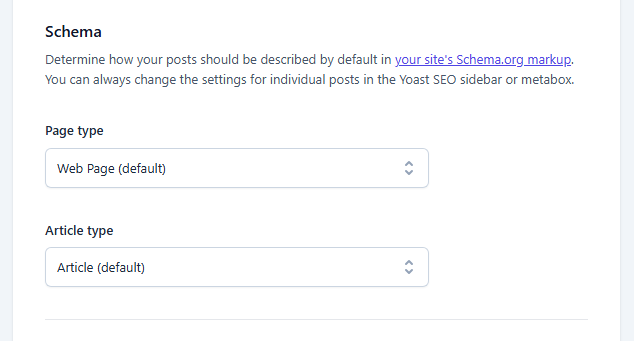
If you have to choose a default schema type for the individual blog posts, this is the option.
Make the necessary changes and save the settings.
2.3 Pages
The final settings in the content types section are the page configuration.
As we did with the post settings, you can tweak the pages. The available options are SEO title, meta description, and schema settings.
Next is the categories & tags settings.
3.1 Categories
The next option is for categories. Showing category archives in search engine result pages is a good idea.
You can enable this option and save the settings. Feel free to customize the SEO title with the available variables.
Usually, people won’t list tags in the search engines. So, you can disable this function.
Do not enable tag archives unless necessary, as this can cause duplicate content issues.
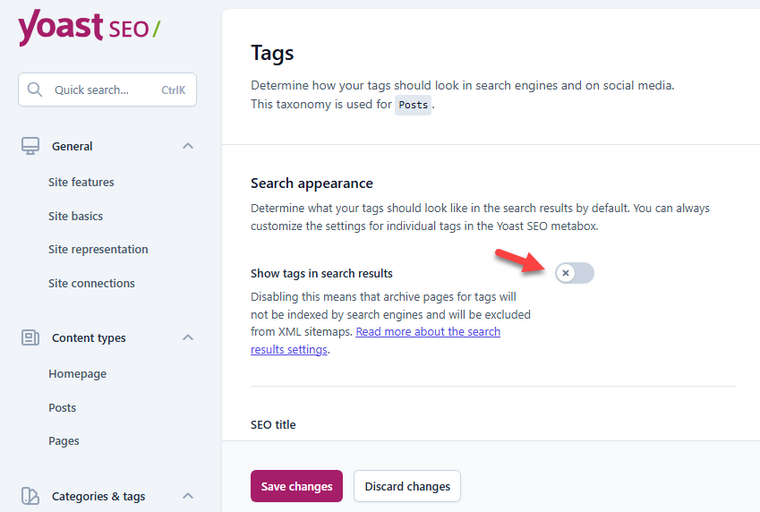
On the other hand, If you’re a news organization, enabling tag archives may be useful.
4. Advanced
Configure the advanced settings as follows:
4.1 Crawl Optimization
By default, WordPress adds a lot of metadata and content formats to the <head> section of your website. This will make the website bulky, and it will take longer to crawl its contents.
By removing this unnecessary data, you can further optimize the website and reduce the overall carbon footprint by eliminating the time required for crawling.
Breadcrumbs are a good way to let the website visitor know about he current path. Without using any third-party breadcrumb plugin, you can use Yoast SEO’s built-in breadcrumbs feature.
Open the breadcrumbs tab first.
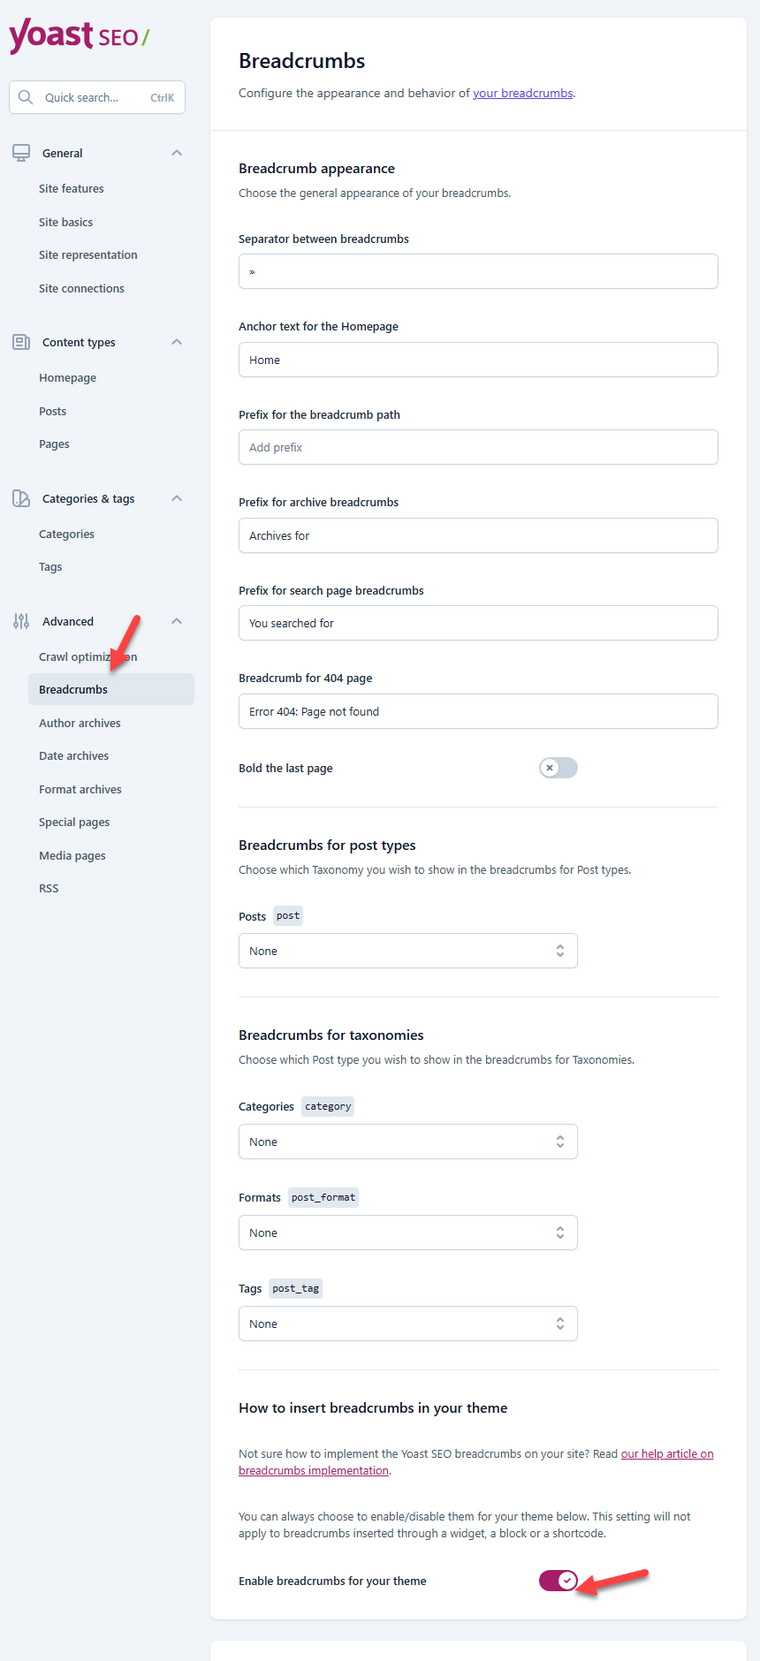
You can configure the separator and anchor text however you like. Once you’re done, enable it in the theme and save the settings.
If you are running a single-author blog, you can disable the author archive. On the other hand, if you’re handling a multi-author blog, such as a news website, the author archive must be enabled.
4.4 Date Archives
Date archives are not that mandatory for most websites. It is recommended for news websites only.
4.5 Format Archives
Sometimes, format-based archives will cause duplicate content issues. For most websites, owners do not need to enable this feature. Hence, we recommend disabling this feature.
4.6 Special Pages
From the special pages settings, you can configure the SEO title for 404 pages and the search result page.
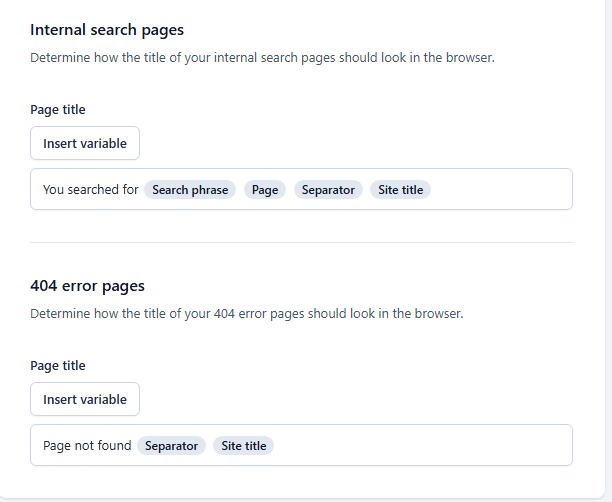
Feel free to use variables to customize the SEO titles as you like.
4.7 Media Pages
We will not recommend creating media pages. It can cause thin content issues on your website.
4.8 RSS
The final option is RSS settings. If you send a daily or weekly newsletter using your website’s RSS feed, this configuration will be helpful.
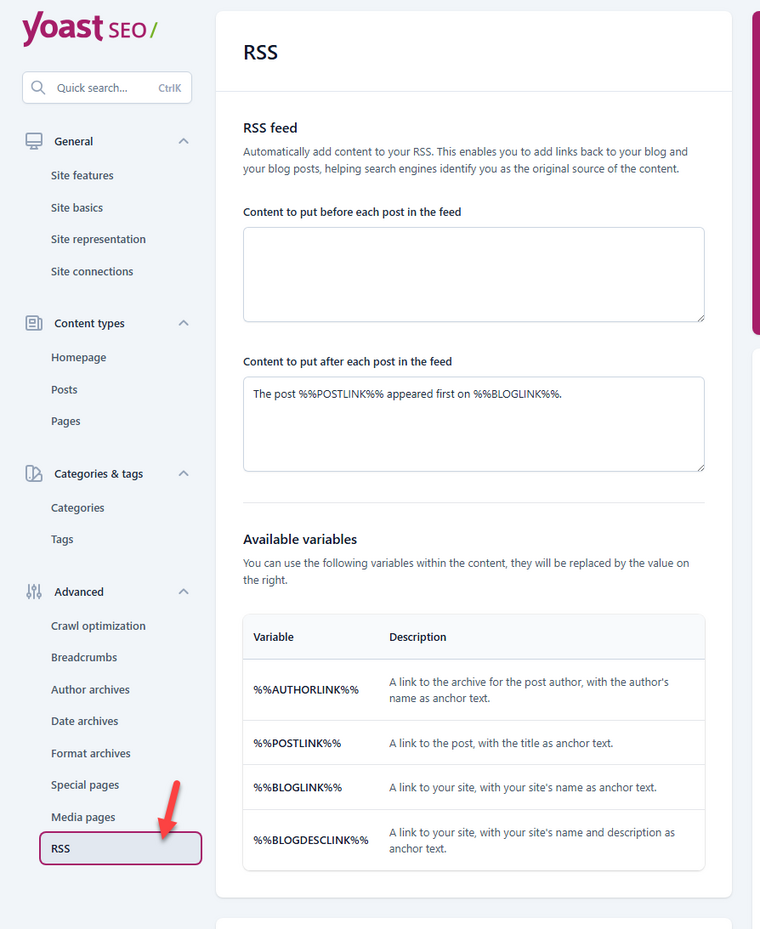
As you can see in the screenshot above, with these settings, you can add content before and after each post in the feed. By default, Yoast SEO will add some code to the after section.
But that is fully customizable. You can use variables like:
- %%AUTHORLINK%%: A link to the archive for the post author, with the author’s name as anchor text.
- %%POSTLINK%%: A link to the post, with the title as anchor text.
- %%BLOGLINK%%: A link to your site, with your site’s name as anchor text.
- %%BLOGDESCLINK%%: A link to your site, with your site’s name and description as anchor text.
To customize it.
3. Integrations
As the name suggests, if you need to integrate third-party plugins or services with Yoast SEO, this option is the right place.
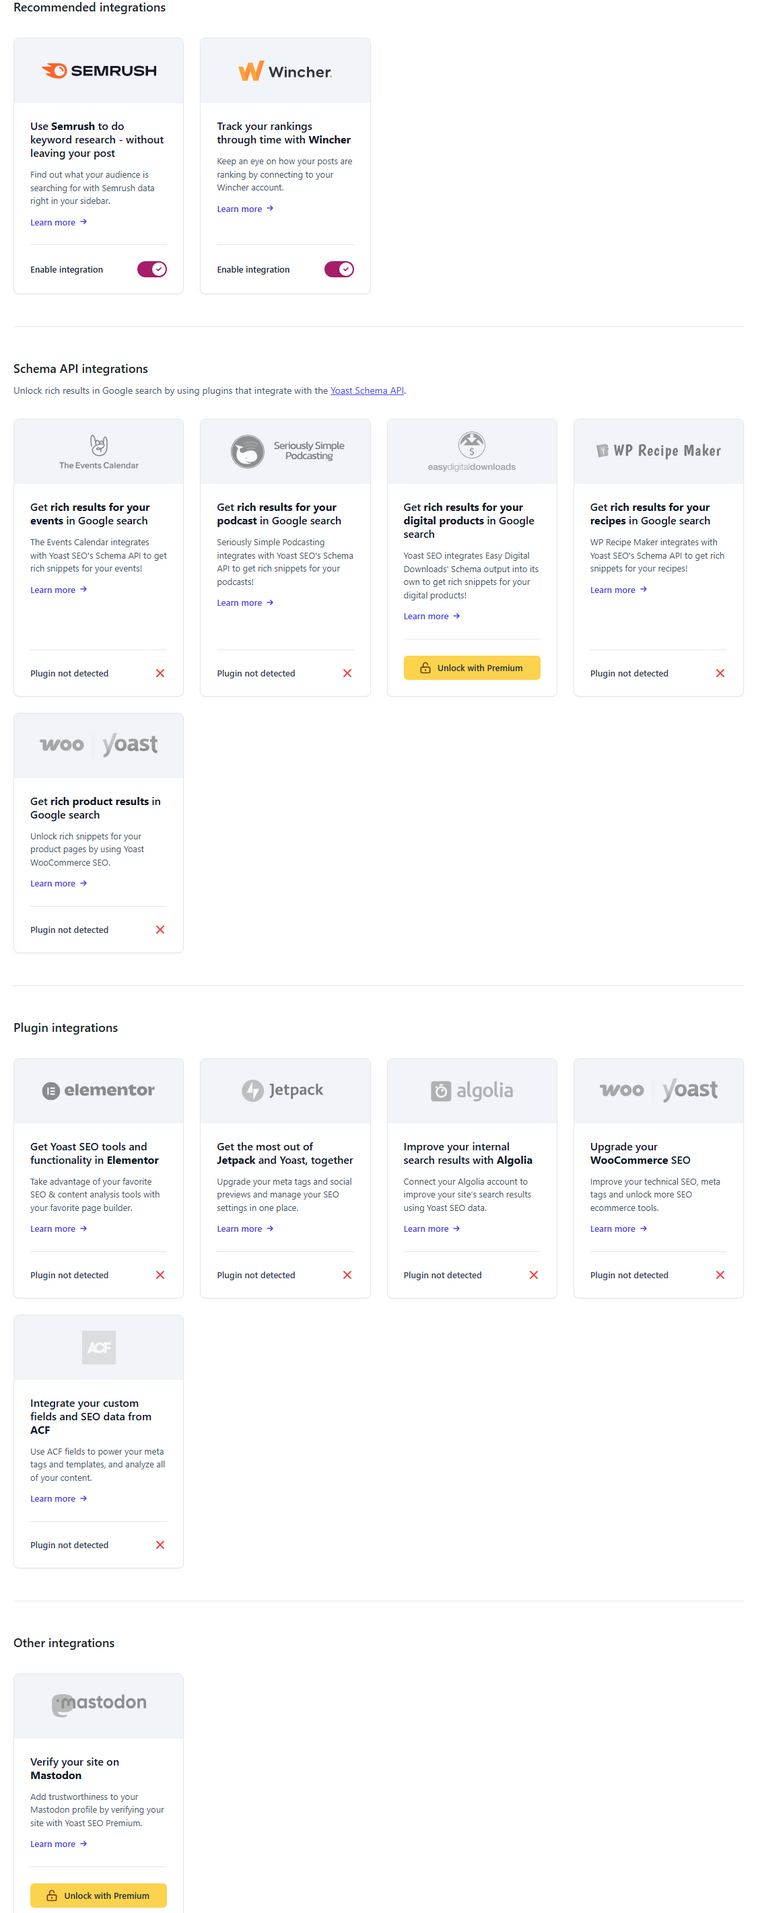
Integrating the plugins you use with Yoast will help ensure compatibility issues are avoided.
4. Tools
The tools section covers these options:
- Import and Export
- File Editor
- Bulk Editor
Here is what these settings have to offer.
1. Import & Export
If you need to import Yoast configuration from another website or export the current configuration, this is the right place to do it.
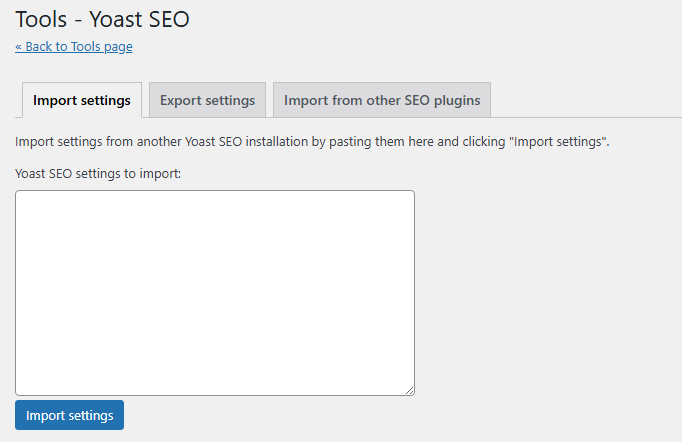
Besides importing and exporting Yoast configurations, you can also import the configurations of other SEO plugins (a premium feature).
2. File Editor
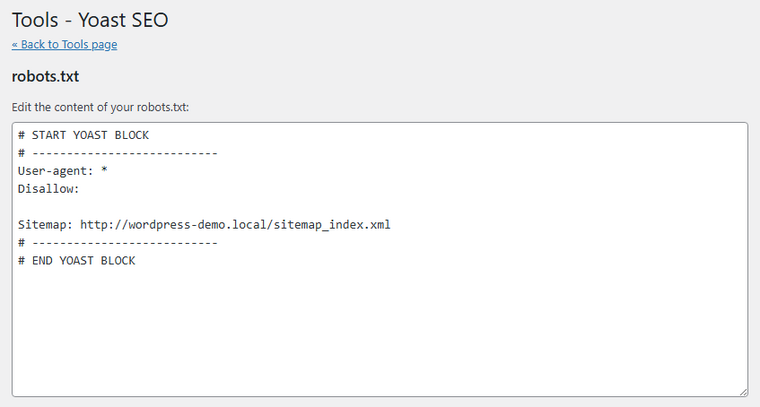
Using the file editor function, you can edit the robots.txt file.
3. Bulk Editor
With the bulk editor, you can edit all the content types (posts, pages, or even custom post types) that are available in your WordPress website.
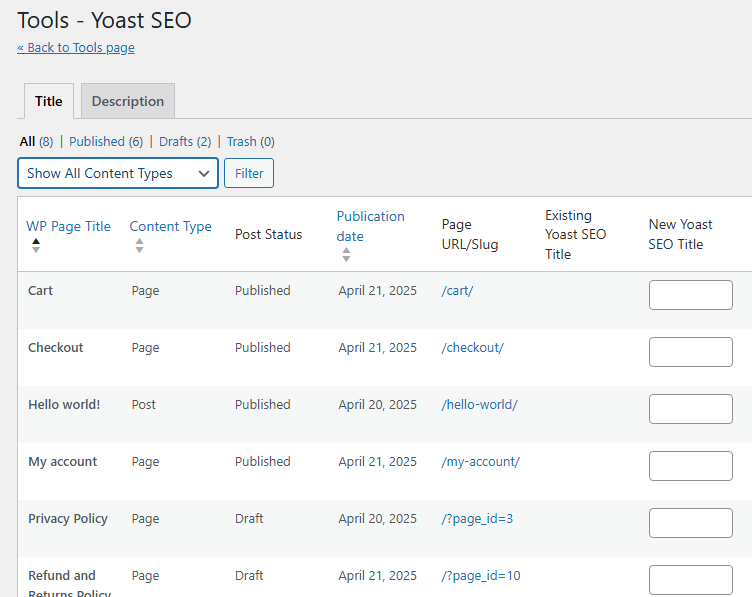
Since everything is available in one place, editing those would be easy.
5. Academy
If you need to learn some SEO skills, this is the right place. The Academy contains several SEO courses that you can use to improve your SEO knowledge.
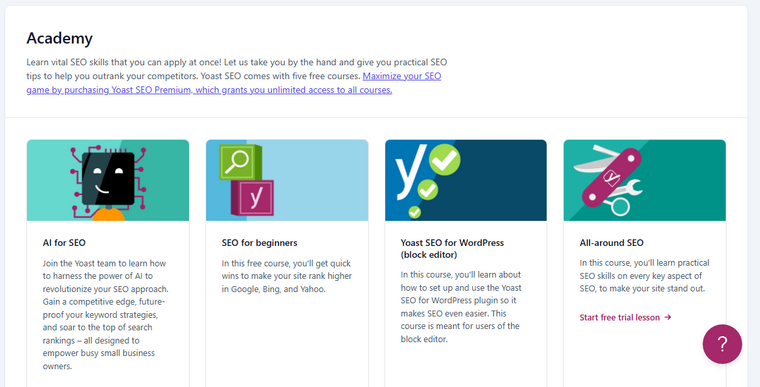
Some of the courses are free, while others are available only for the Yoast SEO premium users.
6. Upgrades
If you visit the Upgrades section, you’ll see the major extensions available for the Yoast SEO plugin.
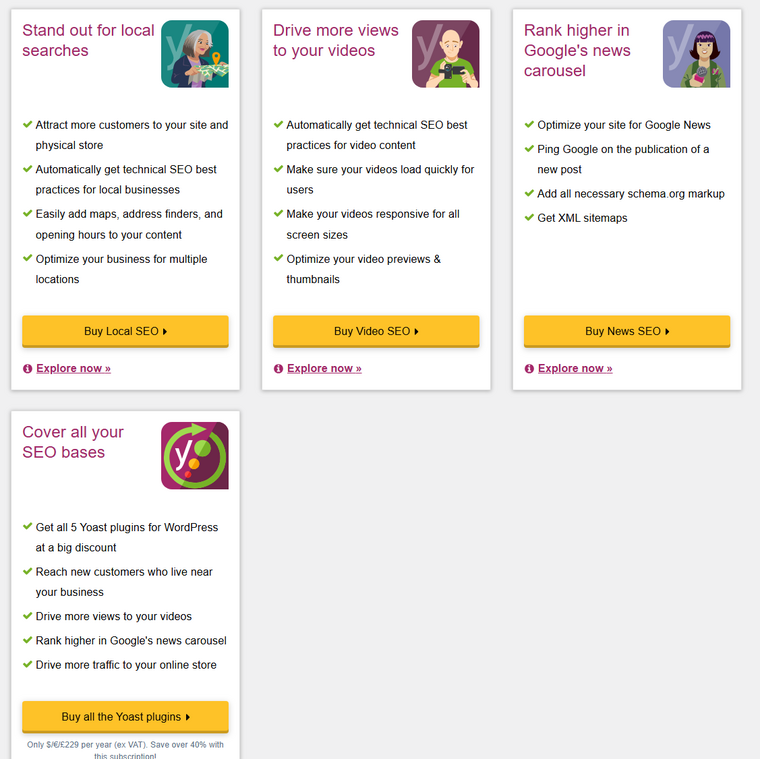
The major extensions available are:
- Local SEO
- Video SEO
- News SEO
You can buy individual add-ons or purchase everything in a bundle.
7. Workouts
SEO workouts are another premium feature offered by Yoast. These will help you optimize your content even further.
8. Redirects
Redirects are a feature of Yoast SEO Premium. If you’re using the free version of the plugin, you won’t be able to access this feature.
Hence, if you need to set up redirects on your website, you have to rely on a third-party plugin like Redirection.
9. Support
Here, you won’t see any configuration options. This support section contains mostly FAQs and their answers. If you need help setting up the plugin or configuring a specific feature, check out the support section.
Here, we will compare both the free and premium versions of the Yoast SEO plugin.
| Feature | Yoast SEO Free | Yoast SEO Premium |
|---|---|---|
| Focus Keywords | 1 Per page | Up to 5 Per Page |
| SEO & Readability Analysis | Yes | Yes |
| Internal Linking Suggestions | No | Yes |
| Redirect Manager | No | Yes |
| AI-Powered Content Suggestions | No | Yes (Beta Version) |
| 24/7 Support | No | Yes |
| Advanced SEO Settings | Limited | Full Control |
| Automated Internal Linking | No | Yes |
How to Use Yoast WordPress SEO Plugin
Here is how you can optimize your blog posts with the help of the Yoast SEO plugin. The first thing you need to do is open the classic or block editor.
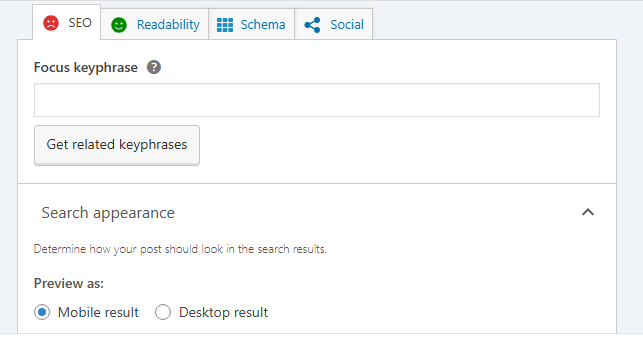
How to use Yoast SEO in WordPress:
When editing a post or page in WordPress, scroll down to the Yoast SEO box.
- Enter your focus keyphrase.
- Edit the SEO title and meta description.
- Review the SEO and readability analysis for suggestions.
- Edit Schema data, social image, and more.
- Apply Yoast’s recommendations to improve your content before publishing.
This process helps you optimize each page or post for better search engine rankings and readability.
However, some of the advanced features will be available only with the Yoast Premium plugin.
You can save or update the blog post or piece of content you’ve worked on after optimizing it using the available suggestions.
Bonus Tips on Optimizing the Website for Better SEO and Ranking
To truly optimize your website for higher rankings, there are several tips to keep in mind. Here are some of the main points you need to know:
- SEO Settings: Ensure your SEO title and permalink settings are optimized for better rankings.
- Internal Links: Use internal links to connect related content, helping search engines crawl your site more effectively.
- Focus Keyphrase: Optimize your pages and posts for your focus keyphrase and primary keywords.
- Cornerstone Content: Create and promote your cornerstone content, which is the most valuable and meaningful content on your site.
- Content Optimization: Regularly update and improve content, using both primary and secondary keywords for better optimization.
- Use a table of contents block: With the help of a table of contents block, website visitors can navigate easily. You can also improve your overall SEO with it.
- Google Analytics: Use Google Analytics to track your site’s performance and identify opportunities for improvement.
Frequently Asked Questions
Now, let’s see some frequently asked questions regarding this topic.
What is the Yoast WordPress SEO Plugin?
The Yoast SEO plugin is a powerful tool that helps WordPress users optimize their sites for search engines by improving content, meta descriptions, and technical SEO.
How can Yoast SEO improve my blog posts?
Yoast offers real-time SEO analysis and readability score suggestions, helping you optimize blog posts with better SEO titles, focus keywords, meta descriptions, and internal links.
You can link your social media profiles inside Yoast settings to help search engines understand and connect your website with your official social network accounts.
Should I use the Advanced settings in Yoast SEO?
The Advanced settings give you deeper control over schema settings, the redirect manager, and indexing rules, but they should be adjusted carefully to avoid harming your SEO.
How does Yoast SEO prevent duplicate content issues?
By managing author archives and Custom Post Types, Yoast ensures that your site doesn’t suffer from duplicate content penalties that could lower your rankings.
What is cornerstone content in Yoast SEO?
Cornerstone content marks your most important pages, helping you strengthen internal linking and boost the visibility of key topics on search engines.
How does Yoast SEO integrate with Webmaster Tools?
Yoast makes it easy to connect with platforms like Google Search Console, allowing you to verify your site and monitor SEO performance through webmaster tools.
What is the importance of setting a focus keyword in Yoast?
Choosing a strong focus keyword ensures your content stays aligned with search intent, helping boost your SEO score and visibility in organic search.
Is Yoast SEO free?
Yes! Yoast offers a free version that covers all essential SEO features for most websites. There’s also a Premium version with advanced tools like multiple focus keywords, content insights, and redirect management.
No, you don’t need both. Yoast SEO Free covers essential SEO needs, while Yoast SEO Premium offers extras like multiple focus keywords, redirect manager, and internal linking suggestions. Choose Premium if you want advanced features, but the free version is powerful enough for most users.
Why is Yoast better than Rank Math?
Yoast SEO offers better readability analysis and a user-friendly interface. Rank Math provides more advanced SEO features like global SEO options, schema support, and AI tools, especially in its free version. Both make on-page SEO optimization easy — you can choose Yoast for simplicity and Rank Math for extra features.
What is the difference between Yoast and SEMrush?
Yoast SEO is primarily an on-page SEO plugin for WordPress, helping optimize content and technical SEO. While SEMrush is a full-fledged SEO suite offering keyword research, site audits, competitor analysis, backlink tracking, and more. They complement each other well; many users use Yoast for on-site optimization and SEMrush for broader SEO strategy.
Is Yoast better than Surfer SEO?
Yoast SEO focuses on on-page SEO optimization and technical settings within WordPress, helping you optimize content and meta tags easily. Surfer SEO is more of a data-driven content analysis tool that guides keyword usage based on competitor data. They serve different purposes, so many users combine both for the best results.
What is the sitemap limit in Yoast?
Yoast generates XML sitemaps automatically and splits large sitemaps when necessary. Each sitemap contains up to 1,000 URLs by default, which helps keep sitemaps manageable and compliant with search engine guidelines.
Does Yoast only work with WordPress?
Yes, Yoast SEO is built exclusively as a WordPress plugin and doesn’t support other platforms or standalone use.
How do I add Google Search Console to Yoast SEO?
Yoast SEO makes it easy to connect to Google Search Console:
1. In WordPress, go to SEO → General → Webmaster Tools.
2. Paste the verification code from Google Search Console into the Google verification field.
3. Save changes.
4. Then, verify your site in Google Search Console. That’s it.
How do I change the separator in Yoast SEO?
To change the separator (the symbol between your page title and site name in search results):
1. Go to SEO → Search Appearance in your WordPress dashboard.
2. Under the General tab, find the Title separator option.
3. Select your preferred separator from the list.
4. Save changes.
This small tweak helps customize how your site appears in Google results.
Does Yoast SEO slow down a website?
Yoast SEO is designed to be lightweight and efficient. While it adds some processing, it generally does not noticeably slow down your website when properly configured. In case of a very large site 95k posts), you may notice some sluggishness in the editor. To keep your site fast, avoid installing too many SEO plugins, and keep Yoast updated.
Conclusion
Setting up the Yoast WordPress SEO plugin properly can be a real game-changer for your site’s Search Engine Optimization efforts.
By fine-tuning the default settings, improving post titles and meta descriptions, and utilizing features like SEO analysis and internal links, you can create a strong SEO foundation.
Yoast helps you stay aligned with what search engines value most.
As you can see in this guide, setting up Yoast is not a challenging task. By following our step-by-step tutorial, you can remove the default Yoast settings and optimize your individual posts and pages even further.
If you want to get more interesting features, we recommend getting the Yoast SEO Premium. The premium plugin is a good investment if you wish to do more optimizations.
Which other plugin configuration do we need to cover next?
Let us know in the comments.





Hi,
Some of what you suggest to fill-in does not work for eg.
Under Taxonomies
Title template: By default it should look like
%%name%%, Author at %%sitename%% %%page%%
or you can use: %%title%% %%page%%
Please do go through and suggest what is to be done.
Cheers,
Kiran
Hey Kiran,
You can keep the fields of your choice. However I prefer to keep it as : %%title%% %%page%%
thanks for dropping by.
Great Job! Really liked your article. Helped me a lot in optimizing Yoast. Thanks. 🙂
This is the first article I read about Yoast Plugin Optimization. I will use your tips. Thank you. I let you know if it helps to improve my ranking.
Hey Srinivasan,
Glad that I could help.
Thanks for your awesome feedback.
I am a newbie and I was searching for better SEO setup and I landed here.. Thank you so much for the post.. Good work. Thanks 🙂
Hey Dhiraj,
Glad that you find this post useful.
Wanna thank for your nice response.
Thanks for the info 😀
anyway, please update the post Using the Latest Yoast SEO Plugins.
cheers,
Hey Ksatrian,
Glad that I could help.
Thanks for dropping by. I will surely update ASAP.
Hello,
I am using the latest YOAST as on today and under the SEO>Social>Facebook Tab, the option to add Frontpage settings Title, Description and Image used in the Open Graph meta tags for the front page is no more available.
How can I set this?
I dont want to use another plugin.
Thanks
Hey Dannyo,
The latest Yoast SEO plugin version 5.3.2 has all the options for Facebook Open Graph Meta data. However, one of the followings should fix your problem:
1. Clearing all the cache in cache plugin, in case you’re using one or
2. Export Yoast SEO settings. Deactivate the plugin and activate it again or
3. Uninstall the plugin and install it afresh.
Thanks for stopping by.
Hope it helps.
Nice breakdown on how to use use Yoast SEO! If Yoast wasn’t available, what would other plugin would you use for seo?