If you’ve ever seen the message “The Link You Followed Has Expired” while trying to upload a theme, plugin, or media file on your WordPress site, it can be frustrating and confusing.
Don’t worry, this is a common error, and it usually happens because of some default limits set by your server.
In this post, we’ll explain why this error occurs, how to fix it step-by-step, and tips for avoiding it in the future. Let’s get started!
☲ Table of Contents
- What Exactly Is “The Link You Followed Has Expired”?
- Why Do These Limits Exist?
- How to Check Your Current Upload Limits
- How to Increase Upload Size and Execution Time Limits
- How to Fix “The Link You Followed Has Expired” Error
- Preventive Measures to Avoid “The Link You Followed Has Expired” Error
- FAQ: Troubleshooting the “The Link You Followed Has Expired” Error in WordPress
- How do I fix the “The Link You Followed Has Expired” error in WordPress?
- The link you followed has expired” when uploading a plugin. What should I do?
- How do I fix the “The link you followed has expired” issue on a WordPress localhost using WAMP?
- How can I resolve “The link you followed has expired” error in Divi theme?
- How to fix “The link you followed has expired” on WordPress running inside Docker?
- Final Thoughts
What Exactly Is “The Link You Followed Has Expired”?

This error message appears when WordPress tries to upload or process a file but runs into the default limits set by your web host. These limits are there to protect the hosting server from overload and keep your site running smoothly.
But sometimes, they can be too low for certain uploads, causing WordPress to stop the process and show this error.
It’s WordPress’s way of saying: “Hey, this upload or process took too long or was too big for the server settings.”
What Causes “The Link You Followed Has Expired” WordPress Error?
The two main reasons behind this error are:
- File size limits: Your server restricts how big an uploaded file can be.
- Execution time limits: The server only lets scripts run for a certain amount of time before stopping them.
Other causes can include outdated PHP versions or conflicts with plugins.
Common scenarios when this error appears:
- Uploading a large theme or plugin.
- Importing big media files (like videos or high-resolution images).
- Installing or updating plugins/themes from the dashboard.
- Performing other actions that require longer script execution.
Why Do These Limits Exist?

Your hosting provider sets limits in PHP (the language WordPress runs on) to control:
| Setting | What It Does | Default Value | Recommended Value for Larger Uploads |
|---|---|---|---|
upload_max_filesize | Maximum size allowed for an uploaded file | 2 MB | 64 MB or higher |
post_max_size | Max size of all POST data (uploads included) | 8 MB | 128 MB or higher |
max_execution_time | Max time a PHP script is allowed to run, execution limit | 30 seconds | 300 seconds |
max_input_time | Max time to parse input data | 60 seconds | 300 seconds |
If you try uploading larger files than these limits or if the server times out because the upload takes too long, WordPress throws the “Link You Followed Has Expired” error.
How to Check Your Current Upload Limits
Before we jump into fixes, it’s good to know what your current limits are.
Method 1: WordPress Dashboard
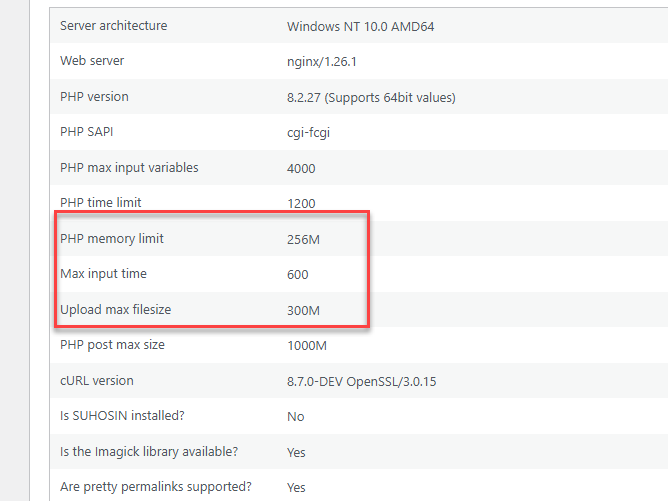
Go to your WordPress dashboard. Now, navigate to Tools → Site Health → Info → Server.

Look for entries like Max upload size, PHP max execution time, and PHP memory limit.
Method 2: Create a PHP Info File
If you want more detailed info, here’s how it’s done:
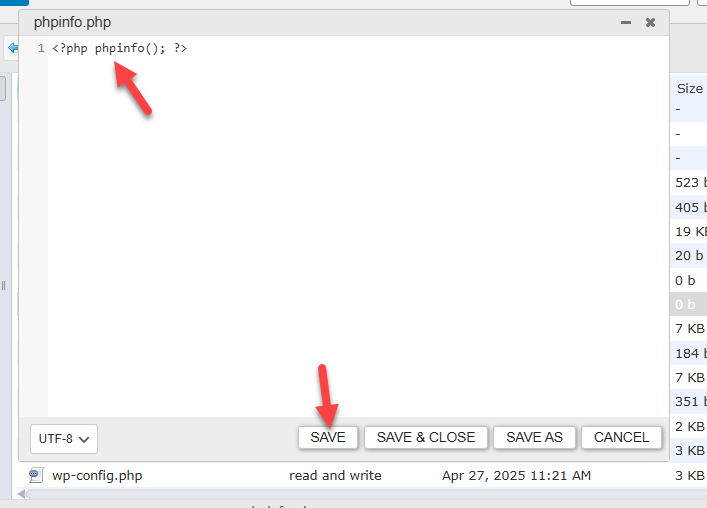
Using FTP or File Manager, create a new file called phpinfo.php in your WordPress root directory.

Add this code inside:
<?php phpinfo(); ?>
Open your browser and go to https://yourdomain.com/phpinfo.php.

Search for upload_max_filesize, post_max_size, max_execution_time, etc.

Remember to delete this file after checking, as it exposes sensitive server info.
Okay, now that you have checked the current limits, let’s learn how to increase these limits to fix the error.
How to Increase Upload Size and Execution Time Limits
Depending on your hosting environment and access level, there are several ways to increase these limits.
You can increase these limits by editing a few important files on your WordPress site or server. I will go through the most common methods step-by-step.
Method 1: Modifying the .htaccess File
If your server uses Apache and allows overrides via .htaccess; in most cases, it does; you can increase limits here.
Connect to your WordPress root directory via FTP or File Manager. Find the .htaccess file. If hidden, enable “show hidden files” option.
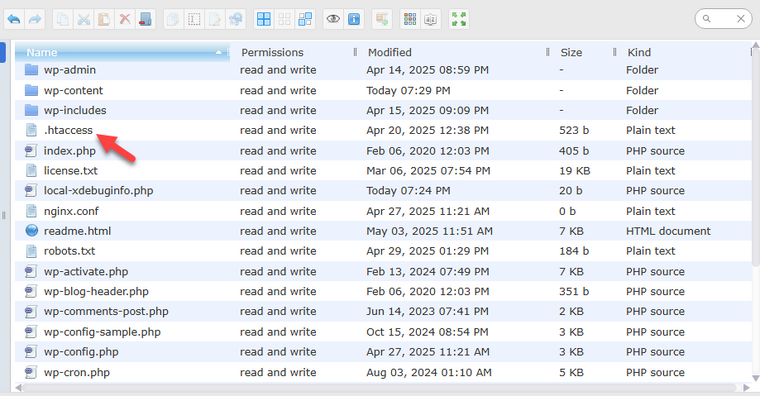
Download and open it in a text editor.

Add these lines at the end:
php_value upload_max_filesize 64M
php_value post_max_size 128M
php_value max_execution_time 300
php_value max_input_time 300

Save and upload back.

Test uploads on your site again.
Please note that incorrect syntax in your .htaccess file can break your site. Always keep a backup of the file before editing.
Otherwise, you can also edit the .htaccess file using a plugin you are already using, such as RankMath or Yoast. Check out our full guide on how to edit the .htaccess file.
Method 2: Using Your Theme’s functions.php File
You can also try increasing limits by adding the following code snippets to your active theme’s functions.php file.
From the WordPress dashboard, go to Appearance → Theme Editor.

Select functions.php from the right sidebar.

Add this code at the bottom:
@ini_set( 'upload_max_filesize' , '64M' );
@ini_set( 'post_max_size', '128M');
@ini_set( 'max_execution_time', '300' );

Save changes.
Keep in mind that changes here affect only the active theme and will be lost if you switch themes or update it unless you use a child theme.
Method 3: Updating the wp-config.php File for Memory Limits
Increasing WordPress memory can also help avoid timeout issues.
Steps:
Access your WordPress root directory via FTP or File Manager. Now, open wp-config.php.

Find this line:
/* That's all, stop editing! Happy publishing. */
Add:
define( 'WP_MEMORY_LIMIT', '256M' );
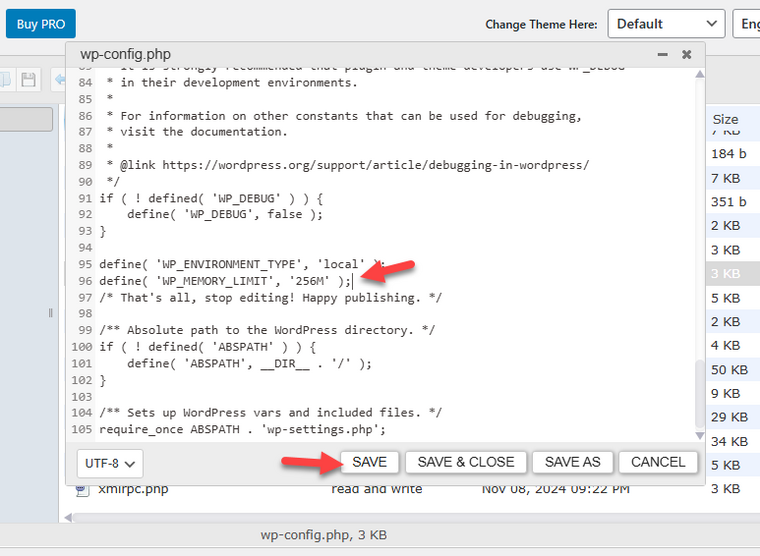
Save the changes. That’s it!
Now, clear the cache and try uploading your file again.
Method 4: Editing the php.ini File
The php.ini file is PHP’s main configuration file. Increasing upload limits here is usually the most effective way.
Connect to your website using an FTP client like FileZilla or use your hosting control panel’s File Manager.
Look for a file named php.ini in your site’s root directory (where WordPress is installed).
If you don’t find one, create a new text file and name it php.ini.

Open php.ini with a text editor and add or update the following lines of code:
upload_max_filesize = 64M
post_max_size = 128M
max_execution_time = 300
max_input_time = 300
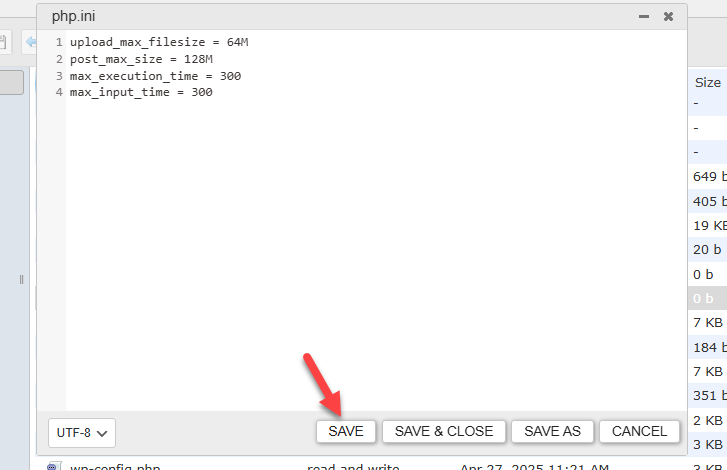
Save the file.
Refresh your WordPress dashboard and try uploading again.
On some hosts, the main php.ini is controlled globally, so these changes might not apply unless you contact your host.
What If You Can’t Edit These Files?
If you’re on shared hosting or don’t have file access for modification, you can:
- Use plugins designed to increase upload size (e.g., Big File Uploads).
- Contact your web host support and ask them to increase upload limits.
How to Fix “The Link You Followed Has Expired” Error

If you are still getting the error, follow these additional steps to fix the “The Link You Followed Has Expired” error on your WordPress site easily, even if you’re new to website management.
- Update Your PHP Version
- Check for Plugin Conflicts
- Adjust WordPress Memory Limit in
wp-config.php
1. Update Your PHP Version for Better Compatibility and Performance
An outdated PHP version can cause upload errors and slow your site down. Most hosts support PHP 7.4 or newer, which offers better speed and security.
How to update PHP version:
- Log in to your hosting control panel (like cPanel or Plesk).
- Look for “Select PHP Version,” “PHP Manager,” or similar.
- From the available options, select PHP 7.4 or higher (PHP 8.0+ if supported).
- Save changes.
- Clear your website cache if you use caching plugins.
- Test your site functionality and uploads again.
Tip: Always back up your website before changing PHP versions to avoid unexpected issues.
If you don’t see an option to change PHP versions, contact your hosting provider for more help.
2. Use FTP to Upload Large Themes or Plugins
If file size limits on your server prevent you from uploading through the WordPress dashboard, FTP is a great way to bypass those restrictions completely.
Steps to upload via FTP:
- Download and install an FTP client like FileZilla.
- Get your FTP login credentials from your hosting provider (usually available in your hosting dashboard).
- Connect to your website’s server using FileZilla.
- Navigate to:
/wp-content/themes/for themes/wp-content/plugins/for plugins
- Extract your theme or plugin
.zipfile on your computer. - Upload the extracted folder to the appropriate directory.
- Go back to your WordPress dashboard.
- For themes: Go to Appearance → Themes, find your uploaded theme, and activate it.
- For plugins: Go to Plugins → Installed Plugins, find your uploaded plugin, and activate it.
This method always works, as using FTP removes file upload size limits imposed by the WordPress admin uploader.
3. Identify and Fix Plugin Conflicts
Sometimes, plugins can interfere with uploads or cause errors like “The Link You Followed Has Expired.” It’s a good idea to check for conflicts if the problem persists.
How to troubleshoot plugin conflicts:
- Go to Plugins → Installed Plugins.
- Deactivate all plugins temporarily.
- Try uploading your file again.
- If the error disappears, reactivate plugins one by one.
- After activating each plugin, test uploading again.
- When the error returns, you’ve found the conflicting plugin.
- Consider updating, replacing the problematic plugin, or contacting the plugin developer for support.
Preventive Measures to Avoid “The Link You Followed Has Expired” Error
1. Backup before changes
Always back up your site before making any changes to the server or WordPress core files, like php.ini, .htaccess, wp-config.php, or theme files. Use trusted WP backup plugins like WP Vivid or UpdraftPlus, and store these backups off-site to protect against data loss.
2. Monitor server settings
Regularly review your hosting environment via WordPress’s Site Health tool via Tools → Site Health → Info → Server to ensure PHP settings like “Max upload size”, “PHP max execution time,” and “PHP memory limit” meet your needs.
3. Limit huge uploads
Optimize images with tools like ShortPixel or TinyPNG, compress videos, and use external video hosting when possible. Only upload necessary themes and plugins to minimize server load.
4. Regularly update PHP
Ensure your PHP version is current to benefit from improved performance, security, and support for larger uploads.
FAQ: Troubleshooting the “The Link You Followed Has Expired” Error in WordPress
Now, let’s see some of the frequently asked questions regarding this topic.
How do I fix the “The Link You Followed Has Expired” error in WordPress?
Increase your server’s upload size limit to 64 MB or more and extend the PHP script execution time to about 300 seconds by editing files like php.ini, .htaccess, or wp-config.php.
The link you followed has expired” when uploading a plugin. What should I do?
You should increase the upload_max_filesize, post_max_size, and max_execution_time values to 128M, 128M, and 300, respectively, in your php.ini file to allow bigger uploads and longer script running time. Restart your server after changes.
How do I fix the “The link you followed has expired” issue on a WordPress localhost using WAMP?
For localhost setups like WAMP, the fix is similar, but you need to do it locally:
Find your php.ini file in the WAMP installation folder and edit it (wamp/bin/php/phpX.X.X/php.ini).
Look for these PHP settings and increase their values, for example:
upload_max_filesize = 64M
post_max_size = 128M
max_execution_time = 300
Save the file and restart the WAMP server using the control panel to apply changes.
How can I resolve “The link you followed has expired” error in Divi theme?
With the Divi theme, this error is usually caused by low PHP limits on your server. Add these lines of code to your wp-config.php file to increase limits temporarily:
ini_set(‘upload_max_filesize’, ‘128M’);
ini_set(‘post_max_size’, ‘128M’);
ini_set(‘max_execution_time’, ‘300’);
Save and retry your upload.
How to fix “The link you followed has expired” on WordPress running inside Docker?
When WordPress runs inside Docker containers, you need to adjust PHP settings within the container environment.
You can edit or map a custom php.ini file inside your Docker container to increase upload and execution limits, then restart the container for changes to take effect.
Final Thoughts
Fixing the “The Link You Followed Has Expired” error is usually straightforward once you understand the cause: server limits on file size and script execution time.
By following the steps in this guide, from adjusting key configuration files to updating PHP and managing plugins, you can resolve the issue and prevent it from coming back.
Remember, if you ever feel unsure about making changes yourself, your hosting provider’s support team is always a good resource. And of course, making regular backups is your best safety net.
Which method did you use to resolve the “The Link You Followed Has Expired” issue? Was it easy to fix? Do let me know in the comments below.


