Are you looking for simple ways to install WordPress plugins? If you are, keep reading this blog post. Here, we will show you the top three methods you can use to install WordPress plugins on your website or WooCommerce store.
WordPress dominates the market with a market share of over 43%. One of the major successes of the platform is its customization options, as well as the availability of WordPress plugins that enhance the website’s features.
There will be lots of plugins for almost every task. For example, there are SEO plugins, contact form plugins, and backup plugins that you can download from the plugin developers’ official websites or the WordPress plugins repository.
However, with the proper guide, you can install these WP plugins on your websites without any issues.
In this guide, we cover a simple tutorial on the WordPress plugin installation process without any issues. If you are new to blogging and managing a WordPress website, this article will be super helpful.
☲ Table of Contents
- Best Ways to Install WordPress Plugins
- How to Update WordPress Plugins
- How to Deactivate or Remove WordPress Plugins
- Bonus Tips When Installing WordPress Plugins
- Best WordPress Plugins You Should Know About
- Frequently Asked Questions
- How can I install premium plugins that are not available in the plugin repository?
- Can I use FTP clients to install WordPress plugins?
- Why should I use the plugin search for installing free plugins?
- What are compatibility issues when installing plugins, and how can I avoid them?
- What’s the best way to add custom functionality to my WordPress site?
- What is the difference between installed plugins and active plugins?
- Why should I delete inactive plugins?
- How many plugins can I install on WordPress?
- Is it safe to use an outdated plugin?
- What are mu-plugins?
- What are drop-ins in the plugin area?
- How do automatic updates work for WordPress plugins?
- Conclusion
Best Ways to Install WordPress Plugins
There are three methods to complete the plugin installation process on a WordPress website.
They are:
- Default method (via the WP dashboard)
- Upload the plugin files manually to the wp-content > plugins folder
- Use an FTP client for the installation
Below, we will show you all the methods so you can pick one according to your preferences.
Note: Before installing or modifying any WordPress plugin, it’s a good idea to take a full backup of your site. This helps you recover easily if something breaks due to compatibility issues or unexpected plugin conflicts. Always test new plugins on a staging site if possible.
1. Via the WordPress Dashboard
If you need a straightforward method to install and activate plugins, follow this method. Log in to your WordPress dashboard and go to the plugins section. There, click on Add New.
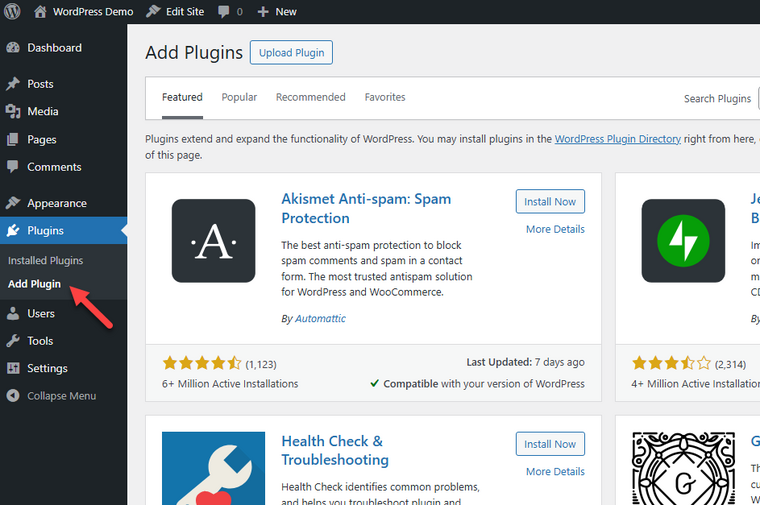
Now, you can use the search bar and find the plugin you need. There are page-building, e-commerce, and gallery plugins available that you can install.
For this tutorial, we will install the WooCommerce plugin. Once you have found the plugin, install it on the website.
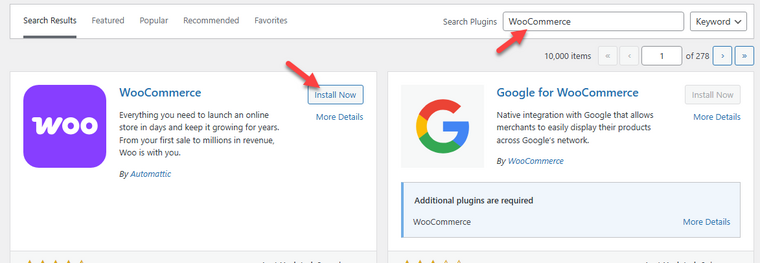
After installation, activate it.
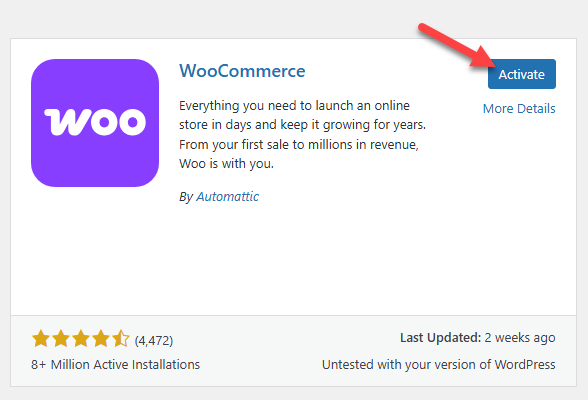
Now that the plugin is activated, you can find the plugin settings on the left side of the WordPress dashboard.

2. Manually Uploading the Plugins
When you have the premium version of a plugin, you need to use this method. Here, you will upload the plugin file (in .zip format) directly to your WordPress website. The plugin file can be downloaded from a third-party source, i.e. premium plugin provider.

Once the process is completed, you can activate the plugin.
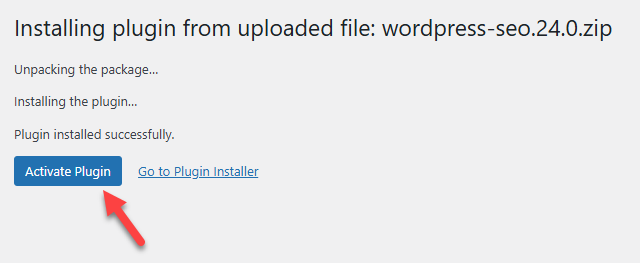
This is also a straightforward process when the plugin is not available in the WordPress plugin directory. This way, you can activate plugins with ease.
3. Using FTP or SFTP
For some reason, if you can not access the backend of your WordPress website or WooCommerce store, you can use the FTP or SFTP method. FTP stands for File Transfer Protocol (SFTP – Secure File Transfer Protocol), and it is used to transfer files from a local machine to a web server.
To use this method, you need one of the popular FTP clients – FileZilla. The next thing you need is the FTP login credentials. You can get the SFTP or FTP login details from your web hosting provider.
Once you have the login details ready, open FileZilla and enter them into the software.
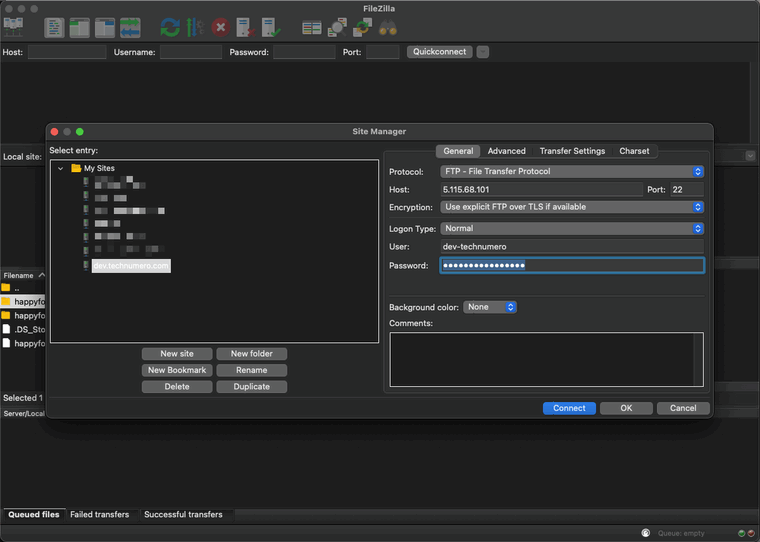
Once the connection is established, you can view the local file storage on the left side and the server’s files and folders on the right side.
Since we are dealing with plugins, you need to go to the wp-contents folder. There, open the plugins, and you can upload the plugin files there.
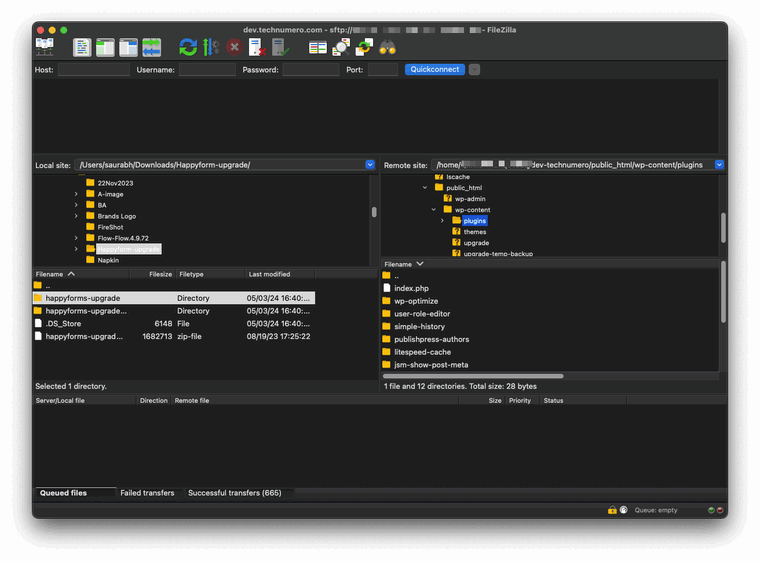
However, we would not be uploading the zip file here. You need to extract the plugin files to your local storage and upload the plugin folder directly to the WordPress plugins folder via SFTP.
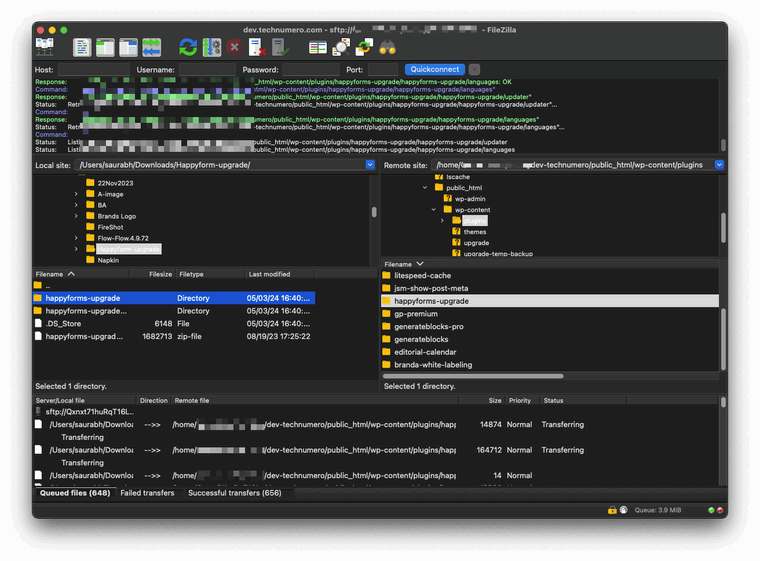
After finishing up the upload, go to the plugins section in your dashboard, and you will see the plugin there. Click the activate button to enable the plugin on your website.

The SFTP/ FTP manager method might be convenient for some people. So, pick it based on your preference and technical knowledge.
How to Update WordPress Plugins
When the plugin developers release a new, upgraded version of their plugin, you will get a notification on the WordPress updates page.
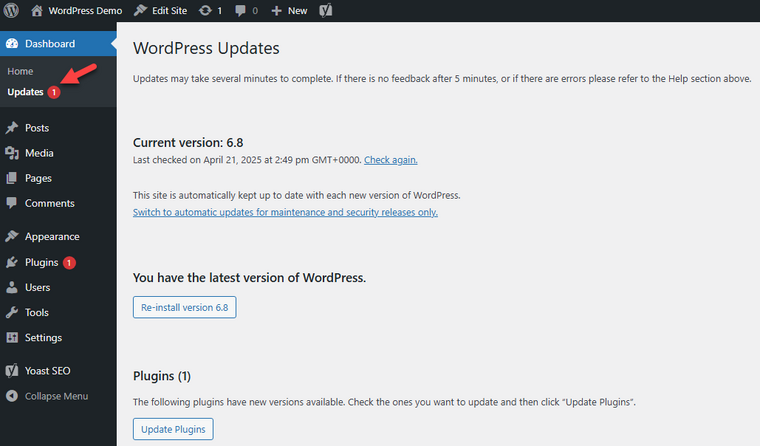
To ensure your WordPress plugins are running smoothly and benefiting from the latest enhancements, it’s crucial to update them regularly. Doing so helps resolve any plugin incompatibility issues and unlocks new features. Below, we will guide you on how to update a WordPress plugin effectively.
There are two main methods (FTP is optional) to update the plugin.
- Via the WordPress update page
- Manually uploading the latest plugin files
Here’s a quick look at how you can do the task.
1. Via the WordPress Update Page
On the left-side menu of your WordPress dashboard, you can see the Updates page as we have shown above.
When an update is available for a plugin, theme, or WordPress core, it will be visible here. When you need to update a plugin, you can come to this page and complete the task.
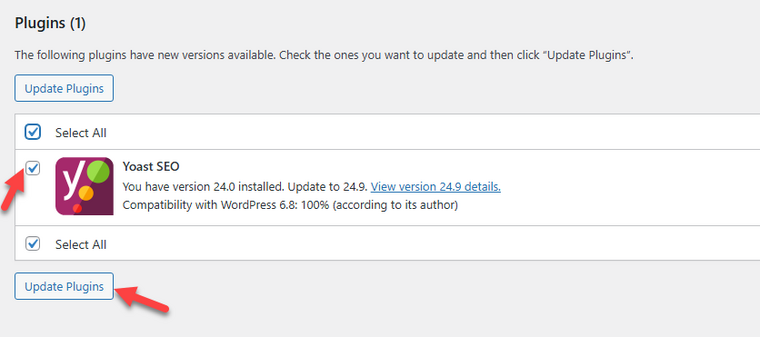
Within a couple of seconds, the plugin will be updated to the latest available version, and you will see a success message as a WP admin notification.
2. Manually Updating the Plugins
Another quick way to update the WordPress plugins on your website is by manually uploading the plugin files to the plugins page.
You can download your plugin file from a third-party source in case of the premium plugin, or download it from the WordPress plugins directory.
Once you have finished uploading, you will see a message about the plugin update.
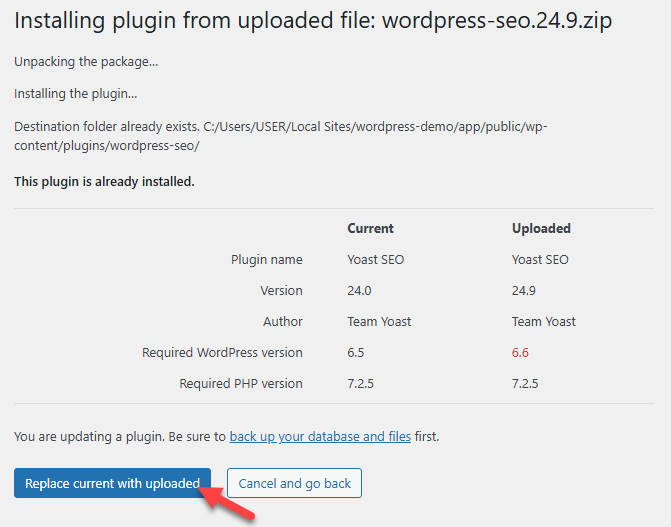
Confirm the update, and you will be running the latest version of the plugin.
How to Deactivate or Remove WordPress Plugins
You do not need to keep unused plugins on your website. Unused plugins will consume space and also pose some security risks.
Hence, removing them from the website is the ideal option.
In this section, we will show you how to deactivate plugins and completely remove them from the plugin folder.
Again, you can use your WordPress plugins page for this task. If you can not access the website’s backend, try using an FTP client.
For this tutorial, we will be showing the normal method, which uses the WordPress backend.
We will be deactivating the Yoast SEO plugin. So you need to go to the plugins section and scroll down to Yoast SEO.
If the plugin is active, you will see a deactivate button.

Once you click the button, the plugin will be deactivated. And after that, you can see the delete button.
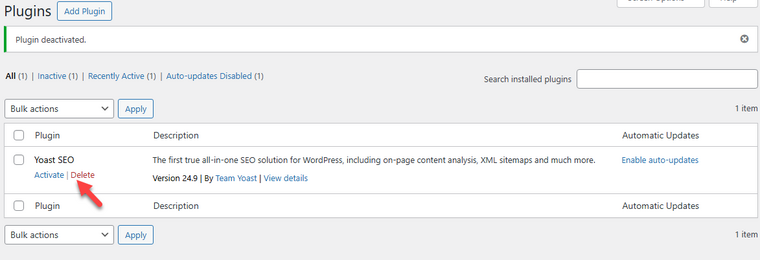
Within a few seconds, the plugin will be completely removed from the website.
This is how you can deactivate and remove a plugin from a WordPress website.
Bonus Tips When Installing WordPress Plugins
Here are a few bonus tips you can keep in mind when installing WordPress plugins on your website:
- Check the plugin zip file: Before uploading, ensure the plugin zip file is properly unpacked and contains all the necessary files to avoid errors.
- Use the search bar: Discover popular plugins using the search bar in your WordPress dashboard. However, be selective about which ones you install.
- Remove unused plugins: Unused plugins not only waste resources but may also create security risks. Delete any plugins that you no longer need.
- Beware of plugin conflicts: Installing too many plugins, especially from third-party websites, can increase the chance of plugin conflicts and affect your site’s performance.
- Plugin management: Efficient plugin management is crucial for preventing conflicts and ensuring seamless performance across your website.
- Update regularly: Always keep your plugins up to date. Outdated plugins can lead to compatibility issues and security vulnerabilities, especially after core updates.
- Avoid unnecessary plugins: Keep your site clean by avoiding unnecessary plugins that can cause bloat and potentially slow down your website.
- Focus on essential plugins: Install key plugins, such as a reliable SEO plugin and a strong security plugin, to enhance your website’s functionality and protection.
Best WordPress Plugins You Should Know About
Here are some of the best WordPress plugins we recommend for our visitors:
- Rank Math – Search Engine Optimization (The premium version is recommended for unlocking maximum potential).
- FlyingPress – One of the best WordPress caching plugins. This caching plugin can help you speed up your website. You can enable dynamic caching for the website with this tool. Another good alternative is LiteSpeed Cache.
- ShortPixel – To reduce the image file size without losing quality, you should use ShortPixel or any other image compression plugin for WordPress.
- a3 Lazy Load – If you need to add a lazy loading feature to images, this plugin is useful. Otherwise, you need to use a caching plugin/performance plugin for the same task.
- Sucuri – One of the ideal plugins for security concerns and protecting your website. You can monitor the hacking attempts, infected files, suspicious files, and every file directory on your website.
- Perfmatters – The all-in-one optimization plugin for WordPress with a wide customer base. Since minor optimizations hold a crucial role in the website’s speed, this is one of the top expert picks.
- Bricks Builder – This is an excellent page builder plugin for WordPress with frequent updates. Since it is a drag-and-drop page builder, creating custom pages is easy.
- ManageWP – ManageWP is one of the best management tools for WordPress, allowing you to handle connected sites more conveniently. It comes with extra tools to take care of your website. It is a massive timesaver for busy business owners and bloggers.
- Fluent Forms – An easy-to-use forms plugin for WordPress, which receives constant updates from the plugin developer. Also, it is one of the highly customizable form builder plugins for WordPress.
Frequently Asked Questions
Next, let’s look at some frequently asked questions and their answers related to this topic.
Premium plugins usually come as a ZIP file from a third-party developer. To install one, go to your WordPress dashboard, navigate to Plugins > Add New, and select the Upload Plugin option to manually upload the plugin file. Once installed, activate it to start using the features.
Can I use FTP clients to install WordPress plugins?
Yes, FTP clients like FileZilla can help you manually install plugins. Simply extract the ZIP file of the plugin and upload the folder to the /wp-content/plugins/ directory. Then, activate it from the WordPress dashboard.
Why should I use the plugin search for installing free plugins?
Using the plugin search in your WordPress dashboard is the quickest way to find and install plugins from the official plugin repository. It’s ideal for finding tools with automatic updates and built-in compatibility checks.
What are compatibility issues when installing plugins, and how can I avoid them?
Compatibility issues often arise when a plugin is not tested with your WordPress version or conflicts with another plugin or theme. To reduce the risk, always check plugin reviews, update logs, and confirm support from the developer before installing, especially for custom plugins.
What’s the best way to add custom functionality to my WordPress site?
If you’re looking to add specific features, you can use a custom plugin developed by yourself or a third-party developer. This method gives you flexibility without altering your theme’s core files.
What is the difference between installed plugins and active plugins?
Installed plugins are all the plugins you have added to your WordPress site, but only active plugins are currently running and affecting your website’s features. Inactive plugins remain on your server, but they don’t impact your site unless you activate them.
Why should I delete inactive plugins?
Deleting inactive plugins helps reduce security risks, as even deactivated plugins can be targeted by hackers. It also improves your site’s performance and keeps your WordPress dashboard clean and manageable.
How many plugins can I install on WordPress?
There is technically no limit to the number of plugins you can install on WordPress. However, using too many plugins can slow down your site or cause compatibility issues, so it is best to only keep the plugins you really need.
Is it safe to use an outdated plugin?
Using outdated plugins can put your website at risk for security vulnerabilities and bugs. It’s always safer to keep all your plugins updated to the latest versions for optimal security and performance.
What are mu-plugins?
MU-plugins, or Must-Use Plugins, are special plugins in WordPress that run automatically without needing activation. They’re placed in a specific folder and are often used for essential features that must always stay active on your site.
What are drop-ins in the plugin area?
Drop-ins are unique single-file plugins that override or enhance specific core functions in WordPress, like caching or database handling. You will find them in the plugin area, but they work differently from regular plugins and offer advanced customization.
How do automatic updates work for WordPress plugins?
Plugins from the official repository or trusted developers usually support automatic updates. This ensures your site stays secure and compatible with the latest version of WordPress without needing manual intervention.
Conclusion
Installing WordPress plugins might seem simple, but understanding the fundamentals of plugin installation can save you from future headaches like plugin incompatibilities or the chance of plugin conflicts.
Whether you’re exploring page-building, e-commerce, or gallery plugins, it’s important to choose from official websites or trusted third-party websites to ensure security and compatibility.
While some plugins offer basic functionality, others come packed with advanced features and customization options, giving you the flexibility to enhance your site as needed.
To keep your site running smoothly, always prioritize high-quality plugins that provide regular updates and stay aligned with core version updates.
Which method are you going to use to install WordPress plugins?
Let us know in the comments.


